LITHOS / getting started

Getting started

Everything here runs on your hardware and your WiFi. Start at the top — the first section is a complete Sunday, and every section after it is optional. You can stop at any rung of the ladder.

Updated for v0.6.0-beta.6, with screenshots captured from that release. Room names and settings shown are examples.

New: see the Room audio flow graph →

Rung 1 · A laptop and a mic

Your first Sunday

One laptop at the sound desk. The congregation uses their own phones. Total setup time is about ten minutes, most of it printing the flyer.

  1. Download and open the app. The app is in a private beta: email support@lithos.community with your congregation and the languages you need, and the installers come by reply. The macOS build is signed and notarized. On Windows, SmartScreen shows “Windows protected your PC” the first time — click More info → Run anyway. Then Windows asks whether to let Lithos through the firewall: tick both Private and Public networks, or phones on the church WiFi will never reach it.
  2. Choose Standalone on the launch card when this laptop runs the service. To use an existing host, choose Connect to a server, select it from the nearby-server list (or enter its address), and enter its operator PIN. Then tick the audio devices this computer may share. You can change the checklist later under This computer → Audio devices.
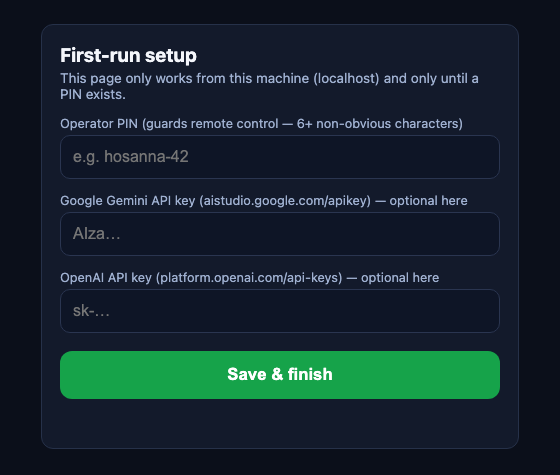
  3. Complete first-run setup. Paste your provider key, choose the listener languages, and set an operator PIN. This one PIN guards the staff pages — operator, presenter, playout — so make it 6+ characters that aren't a year or 1234 (the app refuses weak ones).
  4. Manage your API key — translation is done by an AI provider using your own account. Google Gemini (aistudio.google.com/apikey) is the recommended one — it covers 70+ languages. Paste it on the Operator tab → Setup & advanced → API keysSaveTest; the test opens a real session so you know it works before Sunday.
  5. Turn on your languages. Languages start off — tick the ones you need under Setup & advanced → Languages (add more with + Add language). Each enabled language is one live translation stream, billed per minute by your provider while the service runs — the cost meter on the Operator tab shows the running estimate. (Which languages each provider offers, voices, and the source language are in the languages guide.)
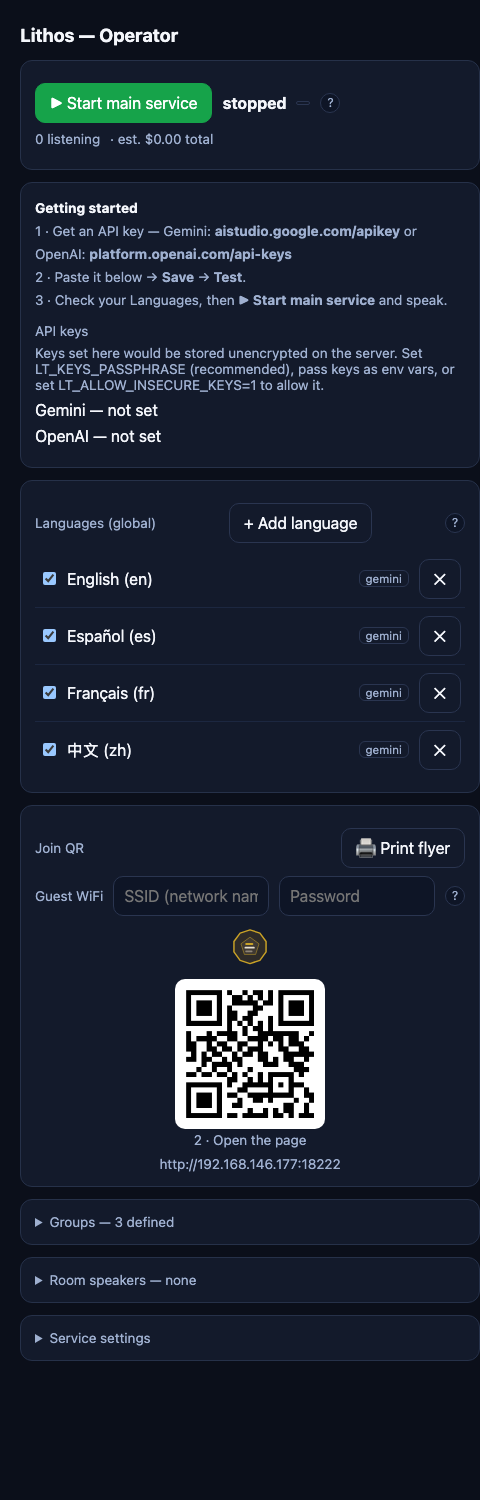
  6. Check the hall. The Rooms card includes the default room, initially named Main group and marked hall. Rename it for your building, check its languages, and set Auto-stop after to cover the meeting. New rooms, including a fresh hall, start with a 60-minute cap; raise it before a longer service.
  7. Print the flyer. The Join QR card holds your guest WiFi name and password (they become a join-the-WiFi QR on the flyer) and a 🖨 Print flyer button. People scan step 1 to hop on the WiFi and step 2 to open the page — nothing to install.
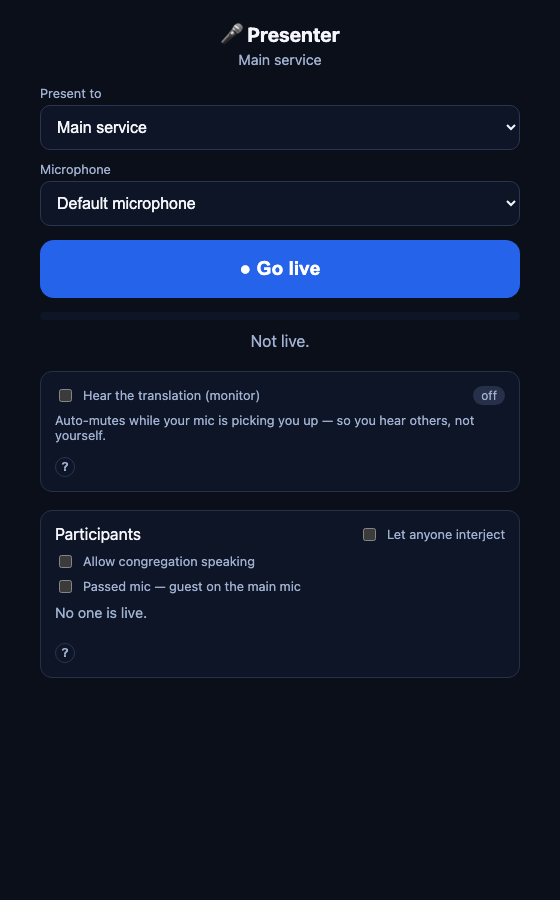
  8. Go live. Switch to the Presenter tab, pick the microphone, tap ● Go live, and speak — that starts the translation too, so there is nothing to start first. Phones show live captions immediately; a tap adds audio for earbuds. If you have a projector, the This computer tab lets you enable a display; then assign its room, languages, layout and join QR on Playout devices. Between meetings just Stop on the Operator tab and Start again — phones stay connected and pick up where they were.
The beta.6 first-run setup: provider key, listener language choices, and staff PIN.
First run: provider key, listener languages, then the staff PIN.
The beta.6 Operator page before translation starts, with the Chapel hall and two classes under Rooms.
The Operator page before translation starts, with the hall and classes listed under Rooms.
The Presenter page for the Chapel, with room and microphone selectors, Go live and participant controls.
The Presenter tab — pick a mic, go live.

You could stop here. One speaker, every language, phones and a projector — that's a whole Sunday.

Rung 2 · No laptop to remember

A box that's always on

Instead of someone's laptop, run Lithos headless on a mini-PC, a spare machine in a closet, or a Raspberry Pi — everyone (including the speaker) connects from a browser. It's the same product with no screen attached.

With Docker installed, it's a two-line file and one command:

# .env — an API key and the staff PIN is all it takes
GEMINI_API_KEY=your-key-here
LT_OPERATOR_PIN=hosanna-42
./run.sh   # finds your LAN address and starts the server

The log prints two links: http://<your-ip>:8080 for the congregation, and https://<your-ip>:8443 for staff pages (the operator console and the presenter's mic need a secure page — staff tap through a one-time certificate notice; the congregation never sees one).

No Docker? Bare Node works too

On a fresh Ubuntu box (verified on Ubuntu 24.04), install Node 22, then install and run from the project folder:

# Node 22 via NodeSource — curl + ca-certificates are the only prerequisites
sudo apt-get update
sudo apt-get install -y curl ca-certificates
curl -fsSL https://deb.nodesource.com/setup_22.x | sudo bash -
sudo apt-get install -y nodejs
# Skips the ~100 MB desktop binary the server never uses — kind to a Pi
ELECTRON_SKIP_BINARY_DOWNLOAD=1 npm install

GEMINI_API_KEY=your-key-here LT_OPERATOR_PIN=hosanna-42 npm run server

Make it come back by itself

A server you started in a terminal — or in a screen session — is gone after a power cut, and it goes quietly: no error, no warning, just pages that don't load on Sunday morning. The release tarball installs it as a service instead, so the box comes back on its own.

tar xzf lithos-server-node-0.7.0.tar.gz
cd lithos-server-node-0.7.0
sudo ./install.sh

It creates a dedicated account, installs the program files and the service, and stops before starting — the example PIN can't do anything, and a server that comes up unable to work looks broken rather than unconfigured. Set your PIN and key, then start it:

sudo nano /etc/lithos-server/server.env   # PIN + an API key
sudo systemctl start lithos-server
journalctl -u lithos-server -f

A Pi usually has no system Node, and its own package manager offers a version that's too old. The installer notices, tells you exactly what it would change — a third-party apt repository, permanently, on that machine — and asks. Say no and it prints the commands to run by hand; nothing happens without an answer. --with-node answers in advance.

Three directories, deliberately: /opt/lithos-server is program files and gets replaced wholesale on upgrade; /etc/lithos-server is your settings; and /var/lib/lithos-server holds groups, languages, room assignments and transcripts. That last one is the thing to back up. Re-running install.sh from a newer tarball upgrades in place and never touches either of the last two.

Optional: lose the certificate warning

You don't need this — the one-time notice on staff pages is harmless to tap through, and most rooms never bother. But if you want a clean padlock (or you're deploying on a real domain), you have three ways — each walked through step by step in the certificate guide, which also explains when the built-in certificate changes and what to do when an iPhone won't tap through:

  • A LAN-trusted cert with mkcert — best for a building you control. Make a local certificate authority once, issue a cert for the server, and point Lithos at it:
    mkcert -install                        # one-time: create + trust a local CA
    mkcert 192.168.1.230 localhost         # issue a cert for the server's LAN IP
    then start the server with LT_TLS_CERT=/certs/cert.pem and LT_TLS_KEY=/certs/key.pem pointing at those files. Devices that trust the CA see no warning anywhere; the rest still work with the one-time tap.
  • Bring your own certificate — already have a real one (a domain, an internal CA)? Point the same LT_TLS_CERT / LT_TLS_KEY variables at it.
  • Put a reverse proxy in front — Caddy or nginx terminating TLS (handy for a cloud/DNS deploy with a real certificate). Set LT_BEHIND_PROXY=1 so Lithos knows it's already behind HTTPS.

One caution with mkcert: the root CA you install on a phone is a powerful trust anchor — only add it to devices you own, and keep its key safe.

Things worth knowing

  • Everything you set from the operator page persists — languages, groups, room speakers, WiFi for the flyer — in a Docker volume that survives updates and restarts. (Avoid docker compose down -v; the -v deletes that volume.)
  • The speaker presents from a phone: open /presenter on the staff link, PIN in, tap Go live. A wired headset mic beats holding the phone.
  • The projector is just a browser: open /projector on any TV or PC and full-screen it.
  • Prefer a file to a web form? Drop a config.json next to the compose file for languages and groups; operator-page edits still win.

You could stop here. A box in a closet, phones in the pews, nobody owns a laptop cable anymore.

Rung 3 · The whole building

Every room in the building

Classes & breakout groups

Each class gets its own translation room: its own languages, its own speaker, its own audience. On the operator page, Rooms → Edit rooms → + Add room (e.g. Sunday School, Youth Group). The teacher opens the presenter page, picks their class in Present to, and taps Go live — that starts the class; nothing bills until then. The full walk-through — adding and editing classes, how they start and stop, a Sunday with two of them — is the groups guide.

People can join a class before it starts — the picker marks it “starts soon,” their phone waits quietly, and the moment the teacher goes live everyone connects at once. The teacher even sees how many phones are waiting.
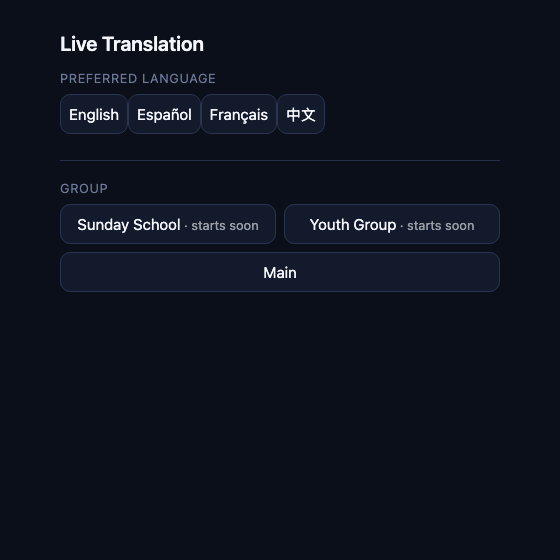
The listener room picker offers Chapel, Sunday School and Youth Group, followed by preferred-language choices.
What the congregation sees: pick a room, pick a language.

Groups nobody set up in advance: a small-group discussion, an interview, a hallway huddle. With attendee groups switched on, anyone starts one from their own phone and the others join by a 6-digit code or QR; it is encrypted, unlisted, and gone when they're done. Turning it on, the caps that bound the bill, and how private it really is are in the private groups guide.

Room speakers & output boxes

Open Playout devices (/playout) to route speakers, microphones and displays. Each device shows the computer it belongs to. Use + also play for… to add the rooms a speaker serves and choose a language for each. Changes apply immediately. A device assigned several rooms follows the one that went live most recently.

  • This laptop: select outputs and microphones under This computer → Audio devices. Microphones are never selected automatically; a presenter must pick one before it streams.
  • A second laptop: install the app, choose Connect to a server, select the host and share the devices you want it to use.
  • A Raspberry Pi in another room: extract the playout tarball and run sudo ./install.sh. It reads the sound cards actually present and writes them into /etc/lithos-playout/devices.json, one output each, named after the card — rename them to what the room calls them. Set the host and PIN in /etc/lithos-playout/playout.env, start it, and the devices appear on Playout devices to be assigned. It runs as a service, so it comes back after a reboot like the server does.

    Across buildings, set the host's address explicitly — LT_SERVER=auto finds hosts by broadcast and that stops at the subnet. Set LT_BOX to the site's name too; it's what keeps two rooms that both have a "Speaker" apart.

  • A browser speaker: open /speaker, name the computer, enter the operator PIN to register it, and add outputs. Use Show devices to make Chrome list USB and HDMI outputs; it requests and releases the mic. Test the output, then keep the tab open and the laptop awake.
  • A room PA: tick this is the room’s PA on the output and check its playback options. A newly marked speaker waits until the speaker finishes by default. Its default routing plays for a phone speaker or when the room microphone switches language.
  • A screen: enable a display under This computer, or open /projector on a TV or browser and use the corner gear to register it. Assign its room, languages, layout and QR on Playout devices. Different screens can show different rooms.
Playout devices in the local demo: a room mic, a PA output, a classroom speaker assigned to two rooms, and a projector with language selections.
Playout devices assigns rooms and languages to each speaker, microphone and display. Open full-size image ↗

A camera as the room microphone

No microphone to spare? If the room already has a camera on the network, its audio can be the input. Only the audio track is pulled — a 4K camera costs its audio bitrate and almost no CPU — and it appears on Playout devices like any other microphone.

The address is the hard part: the path is vendor-specific and the camera rarely tells you. The playout tarball includes a finder:

./find-camera.sh                 # look for cameras on this network
./find-camera.sh 192.168.1.50    # or probe one you already know

It prints the line to paste into devices.json, and tells you whether the stream carries audio as well as video — a picture-only path opens perfectly happily and is no use as a microphone, which is a confusing half-hour to spend after you've wired it up. An NDI|HX camera works here directly; it's ordinary RTSP underneath.

If a camera feed sounds far too quiet, don't reach for gain. Some cameras send the same microphone on both channels with one inverted, and folding those to mono by averaging cancels the voice — 20 to 35 dB of it on real hardware, which is enough to look like a dead microphone. Lithos measures the two channels instead of assuming, and the log says which it's reading: stream channels: reading difference means it found an inverted pair and is subtracting rather than averaging. sum means ordinary stereo — and a quiet feed then really is a level problem, worth fixing at the camera.

See the whole room audio path

Follow a voice from microphone → room → language → physical output. The graph on Playout devices shows who has the floor, how many phones need each language, and which output deserves attention.

Illustrative Room audio demo: three active rooms with 87 listeners, microphones and a phone feeding seven language streams and four outputs; the room PA is highlighted amber.
Illustrative demo rendered by beta.6: three rooms, 87 listeners and four outputs. Sample activity, not a recorded service. Open full-size image ↗
  • Blue paths show audio moving. In the app, the ribbons animate; the counts show phones listening in each language.
  • A phone can take the floor. In Sunday School, Ana’s phone feeds translation while the teacher’s mic yields.
  • Amber calls out an output to check. This example routes the PA through the system default, which may be the speaker the mic can hear.

Test the room before people arrive

The Room audio graph on Playout devices traces microphones through rooms and languages to outputs. Right-click a node (long-press on a phone, or focus it and press Enter). An output offers Test chime for each device; the same 🔔 Test button appears on its device row. Chimes do not start translation or incur provider charges.

A room offers Send English test speech through its real translation path. On a stopped room, Start & send English test speech starts translation and shows its per-minute cost. This test is billed; stop the room afterwards if you are only checking setup.

The Sunday School graph node menu offers Send English test speech and says 15 phones will hear it; illustrative demo.
Right-click a room to send test speech; right-click an output to test its device.

Play a pre-translated video

On the Operator page, upload a clip’s audio tracks, one per language. The browser converts supported media to mono audio; PCM16 mono WAV can be uploaded directly. Mark the video's own soundtrack original. Choose whether the clip is shared or belongs to one group when first uploading it, then choose the room to play it to. Each room has its own player and Stop button, so two classes can use the same clip independently.

Languages with uploaded tracks hear those tracks. Missing languages can receive live translation from the original if that room is already running; playing a clip does not start a billed engine. The microphone is suppressed during playback. With no original or running translation, missing tracks mean silence for those languages.

The congregation speaks back

Any phone can request the mic and be translated for everyone — one voice at a time. The presenter's Participants panel is the switchboard: turn on Allow congregation speaking (until you do, phones show no speak button at all). Each class has its own Allow participants speaking switch, which is remembered after a restart. Grant requests by hand, or flip Let anyone interject for a hands-free discussion. Exactly one voice ever feeds translation, so a teacher on a mic and participants on phones never garble each other. Attendees can also spin up their own temporary PIN-protected group for a hallway conversation — it disappears when they're done.

This is the whole vision: the main hall, every classroom, and the hallway in between — each hearing in its own language.

Rung 4 · The honest FAQ

When something's wrong

Phones can't open the page
Ninety percent of the time: the phone isn't on the same WiFi as the Lithos machine (it wandered onto cellular or a different network — the flyer's WiFi QR exists for exactly this). On a Windows computer the next suspect is the firewall: the allow prompt defaults to Private networks only, and most church WiFi counts as Public. Windows Security → Firewall & network protection → Allow an app through firewall → find Lithos and tick both boxes. If phones are on the right network and it still fails, the router may have client/AP isolation enabled (common on guest networks) — turn it off or use a different SSID. Running in Docker? Set LT_PUBLIC_HOST to the host machine's LAN address so the printed URL and QR point somewhere phones can reach (./run.sh does this automatically).
The staff page shows a certificate warning
Expected, once per device. Staff pages use HTTPS with a certificate the server makes for itself, because browsers only allow microphone access and key entry on a secure page. Tap through the one-time notice. The congregation's page is plain HTTP on purpose — they never see a warning.
The Presenter tab can't see my microphone (Windows)
Windows has its own microphone switch for desktop apps. Settings → Privacy & security → Microphone: turn on Microphone access and Let desktop apps access your microphone. Then pick the mic again on the Presenter tab — a USB mic plugged in after the app opened appears once you reopen the picker.
It refused my PIN
The PIN guards everything staff can do, so weak ones (1234, a year, a short word) are rejected. Pick 6+ characters that aren't guessable — a short phrase like hosanna-42 works well and types easily on a phone.
What does it actually cost?
Lithos itself is free for churches, schools, and nonprofits. Translation runs on your own AI-provider account (Gemini or OpenAI), billed by them per minute, per live language — four languages for a one-hour service is four hours of translation time. Rooms multiply it while they're running; idle rooms and phones waiting in a not-yet-started class cost nothing. The operator page's meter shows a running estimate, and stopping the service stops the spend. Worked examples, the auto-stop guards and a checklist against surprise bills: the costs guide.
Where do my settings live? Are recordings kept?
Settings stay on your machine — the desktop app keeps them in its own app folder; the server keeps them in its data volume. Nothing about your service goes to us. Transcript saving is off by default; when you turn it on, transcripts are text files on your own machine.
Files and support on the Operator page, with downloads for a problem report, log and saved transcripts.
Setup & advanced → Files & support. Downloads come from the host running the service.

Still stuck? Write to support@lithos.community — include what you saw and download a Problem report from Operator → Setup & advanced → Files & support. It comes from the host running the service, even when you connect from another laptop. Review it before attaching it; downloading sends nothing. API keys and transcripts are excluded. The same card offers the host log and saved transcripts.